If you find yourself struggling to observe and photograph a thin crescent Moon, you're not alone.
Lunar imaging is generally one of the less demanding parts of astrophotography.
The Moon is bright, with lots of contrasting features for accurate focus.
Its brilliance in the night sky makes it fairly easy to locate with a camera.
But not all Moon phases are alike, and a thin Moon in particular will push your imaging skills to the limit.
Read our guides on how to photograph the Moon and how to observe a crescent Moon.

A thin Moon is the very thin crescent phase you get just before and after new Moon.
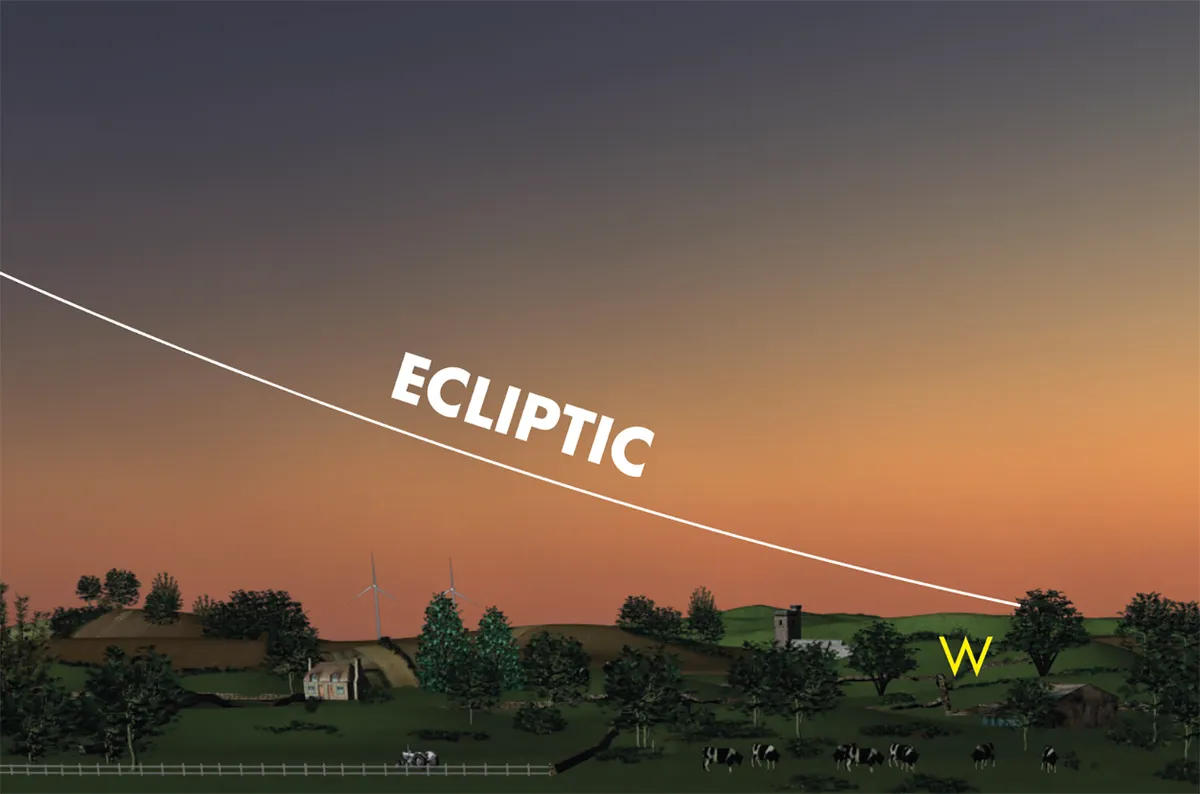
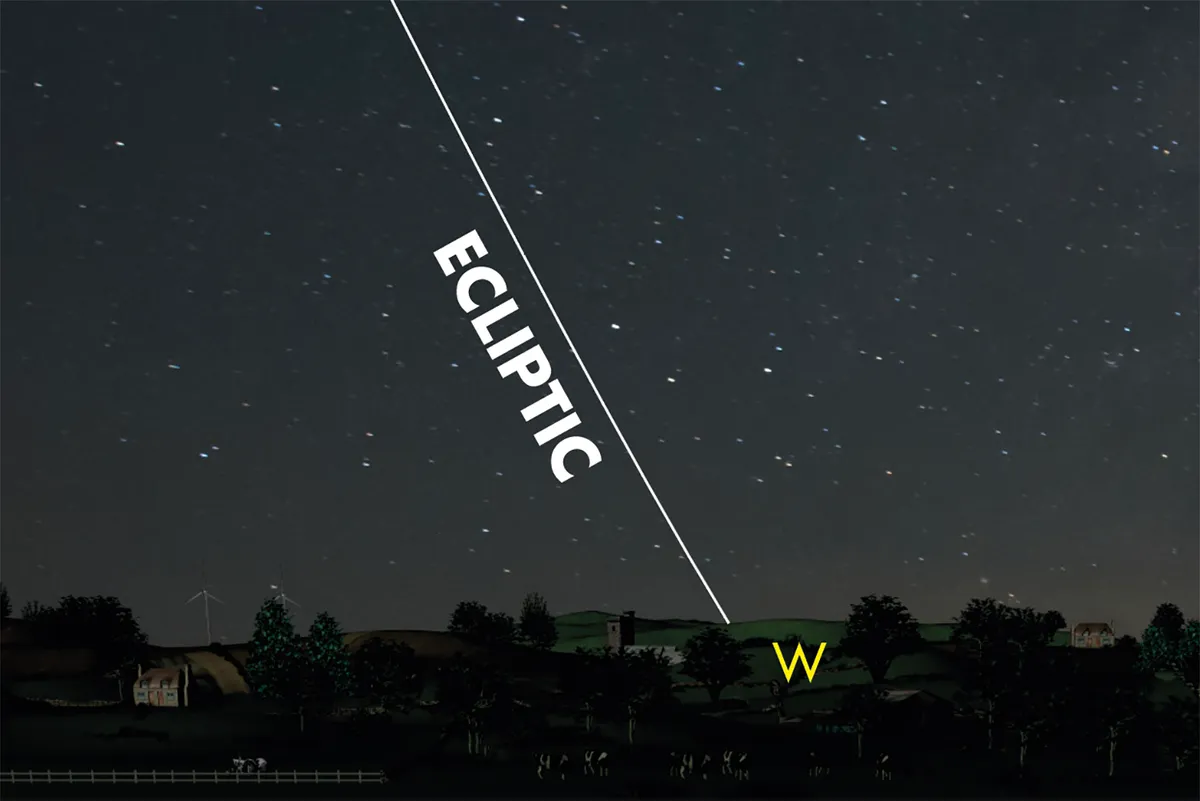
Visibility of crescent Moons depends on several aspects including weather, timing, date and the angle of the ecliptic.
Let’s take these in turn.
4 reasons it's tricky to photograph a thin crescent Moon
Weather
Weather is fairly obvious because if it’s cloudy the Moon will be hidden.
However, as thin Moons lack the brilliance and contrast of a regular-phase Moon, even haze or thin cloud can easily obscure them.
For more help, read our guide on how to predict the weather for stargazing.
Timing
As they are relatively close to the Sun, waiting for the sky to darken sufficiently to see them means the Moon’s altitude will be low.
This naturally places the Moon in a region of sky that is always hazy.
This is heavily affected by the date when you’re viewing.
Another aspect of timing concerns when the thin Moon becomes visible.
In order to stand even a chance of seeing a thin Moon, you’ll need to try outside of the Danjon limit.
This is the smallest separation between the thin Moon and the Sun that the former can be visible.
A Moon closer to the Sun than the Danjon limit isn’t normally visible because there’s not enough illuminated surface to be seen.
The Danjon limit is around 7°.

Date
Each day the Moon moves an average of 12° against the background stars.
Poor timing may therefore result in an old (before new) crescent or young (after new) crescent being too close to the Sun to be seen.
In addition, a well-timed old crescent in the spring or a well-timed new crescent in the autumn will typically not be seen because of the time of year.
This is the all-important date or seasonal aspect.
Ecliptic angle
The Moon’s orbit is inclined to the ecliptic by around 5°.
This means the visibility of thin crescents is heavily influenced by the inclination of the ecliptic to the horizon at sunrise or sunset.
In the spring, the morning (sunrise) ecliptic is shallow to the eastern horizon and the evening (sunset) ecliptic angle is steep to the western horizon.
In the autumn, the opposite is true, with the morning ecliptic being steep and evening ecliptic being shallow.
A steep angle gives a thin Moon better visibility than a shallow angle.
Consequently, during the spring it’s evening thin Moons that are easiest to see, while during the autumn it’s the morning ones that are favourable.
On the morning of 14 September 2023, the Moon’s orbital tilt places it 3° north of the ecliptic.
Just before sunrise this means the Moon will appear vertically above the Sun’s position.
With a separation of 8.9° from the Sun (centre to centre), this is an ideal opportunity to catch this tricky but rewarding sight.

Equipment
- DSLR camera or equivalent
- Telephoto lens or telescope
- Driven equatorial mount (optional)
Photograph a thin crescent Moon, step-by-step
Step 1

Having clear conditions for the thin Moon on the morning of 14 September will be down to luck.
Build up to it by capturing the equally well-placed morning Moons from last-quarter on the morning of 7 September through to the 14th.
This will give you a feel for the capture and where the thin Moon will be located.
Step 2

Use any camera capable of capturing the Moon.
A DSLR fitted with a telephoto lens or attached to a telescope is particularly good for the interactive adjustment of settings required.
A tracking mount isn’t necessary but is convenient.
A high-frame-rate (HFR) camera fitted to a telescope can work well too.
Step 3

If you use a colour HFR camera, an atmospheric distortion corrector will reduce colour fringing caused by light passing through the thick atmosphere at low altitude.
A mono HFR camera with good infrared sensitivity and fitted with an infrared pass filter is ideal as it naturally darkens the surrounding sky.
Step 4

Use the mornings before 14 September to work out the Moon’s location when thinnest.
Make sure the view in this direction is clear of obstruction.
Bright Venus, Regulus (Alpha Leonis) and Mercury can be used as locators.
Extending the Venus–Regulus line for two-thirds that distance again gives you the general area.
Step 5

On the run-up to 14 September, establish your setup in terms of imaging scale.
Consider whether the horizon should be in the shot.
If using a HFR camera, will you do a single capture or mosaic together several shots?
Test your setup, making notes on the correct exposure for the Moon as sunrise approaches.
Step 6

On 14 September, use Venus for focusing and alignment.
Mercury lies half the Venus–Regulus separation below and left of Regulus.
The Moon is 75% the Regulus–Mercury separation left and slightly below Mercury.
If the thin Moon isn’t apparent, take many shots at varying exposures; processing may reveal the crescent.

