One of the greatest draws of astrophotography is how it blends science and creativity.
Once you get to know your camera’s settings, you’ll unlock a plethora of ways to image the night sky.
Even a humble DSLR offers plenty of target choices, from complex deep-sky objects like galaxies and nebulae to beautiful landscapes that celebrate our Milky Way.
In this guide we'll show you how to create a striking moonrise composite that showcases the full Moon’s graceful ascent from the horizon.
More guides to help

What you'll capture
While DSLRs aren’t typically ideal for lunar or planetary photography due to their low frame rates, they’re perfect for letting your creativity flow.
A great example is capturing the Moon’s ascent from the horizon.
This involves shooting your foreground and Moon frames separately, then combining them in post-processing.

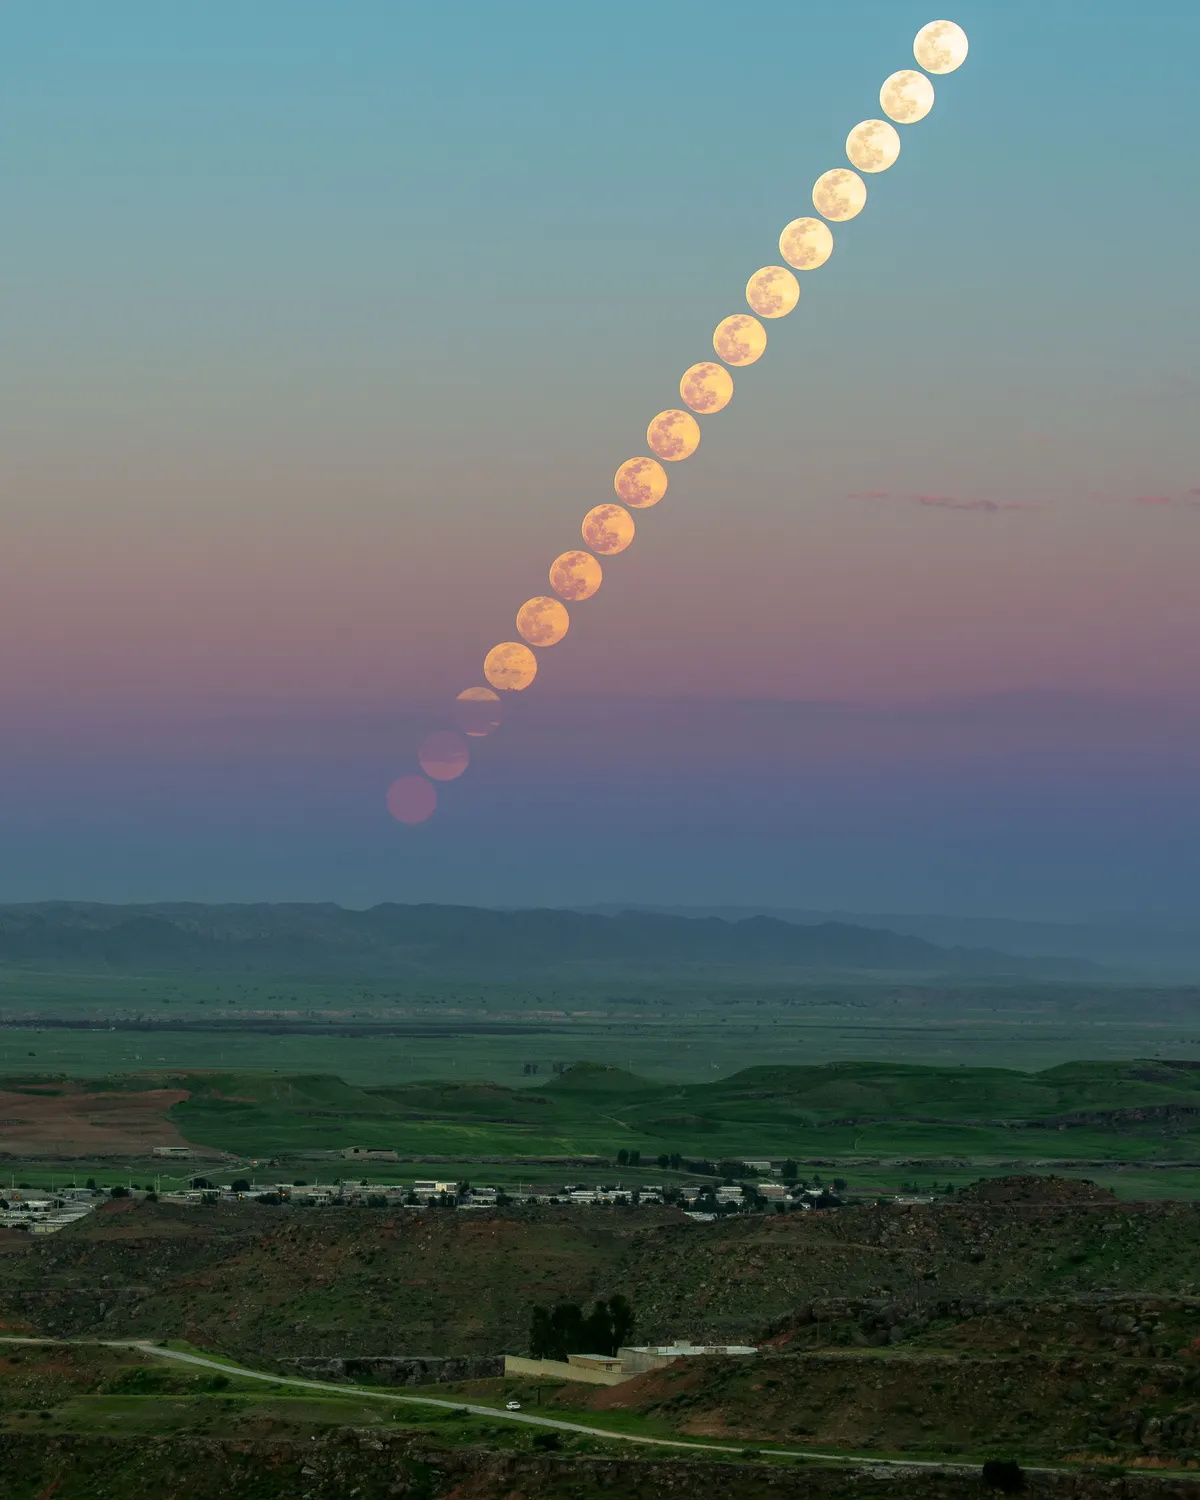
As you can see from our image above, you can capture lovely lunar surface details with a humble kit lens.
And you can also record the Moon’s apparent colour change, from pinkish-orange to brilliant white, as the light it reflects near the horizon is scattered through our atmosphere.

Getting started
To shoot a moonrise sequence, start by checking the next full Moon date and the moonrise and set times for your location (www.timeanddate.com is a great resource for this).
The best time is during the waxing phase, just before the Moon is full.
That’s because it rises just after sunset, which also reduces interference from any background stars.
This is helpful when it comes to blending your foreground and Moon frames.
With no stars or Moon visible when you arrive at your location, use a distant landmark to focus.

A planning app is an essential tool for choosing a good location.
Though they often cost a small fee (PhotoPills, for example, costs £10.99), they’re invaluable for landscape imagers.
These apps show the Moon’s angle of ascent, helping you align your location with its path.

Tweak your camera settings
Before shooting, set your camera to raw format.
For your foreground, manually adjust your settings to achieve depth of field (which requires a mid to high f/ ratio)
Balance your ISO and exposure to capture details with minimal blur.
Our foreground was captured at f/6, ISO 640, with a 30-second exposure using a Canon 7D DSLR.
As the Moon starts to appear, you’ll need to quickly switch and adapt your settings.
Depending on your focal length, you may want to narrow your aperture to avoid over-exposing the surface.
Perhaps start with f/8 and increase as the Moon fully emerges.
If you want a more detailed lunar surface, use a long-focal-length lens (200mm–300mm).
For wider landscape views, a wider lens (75mm–150mm) works well, although the Moon will be less defined.
Finally, setting your intervalometer doesn’t need to be an exact science.
It’s more about consistency: shooting at regular intervals rather than calculating the perfect gap between frames.
That said, it’s better to go for short intervals.
We shot our Moon frames at 30-second intervals and ended up discarding every other frame to create the effect shown, where each Moon closely touches the next.
Equipment you'll need for your moonrise composite
- An astrophotography planning app, such as PhotoPills or The Photographer’s Ephemeris (TPE)
- A DSLR with kit lens (ideally greater than 75mm focal length)
- Sturdy tripod
- Memory cards
- Spare battery
- Intervalometer
- Photo-processing software
Create a moonrise image, step-by-step
Step 1

Plan your shot during the daytime, by heading to your chosen location with a planning app.
Many, including the TPE app on iOS, now have an augmented-reality feature that overlays the Moon’s trajectory and allows you to see exactly where it will rise.
Step 2

Be sure to arrive back at your location at least 30 minutes before the moonrise time to capture your foreground shot (the sky will be too bright once it’s risen).
Take a few shots at different exposures, apertures and ISOs, so you have options later.
Step 3

As soon as the Moon glow appears above the horizon, set your intervalometer.
A 30-second interval is a good starting point – you can always discard frames later to fine-tune the final effect. Start with longer exposures while the Moon is low.
Step 4

As the Moon continues to rise, adjust your settings.
Reduce your exposure time and ISO, plus increase your aperture once the Moon has moved further from the dense atmosphere near the horizon. Take care not to shift the view as you change settings.
Step 5

Take as many Moon shots as you like. We like to capture the journey across the entire frame to show its trajectory.
For our final shots, we used ISO 200, f/11 and a shutter speed 1/125s to keep the Moon as sharp as possible.
Step 6

Process your shots with software like Photoshop or Lightroom. Lightroom lets you batch-process your Moon frames and adjust your foreground before blending.
We opened our Moon images as a layer stack before changing the layer mode to ‘Lighten’.
For help with this, read our guide on how to stack DSLR shots of the Moon.
Share your images with us and they could appear in a future issue of BBC Sky at Night Magazine.
This guide appeared in the October 2025 issue
