We have all seen diagrams showing the planets of our Solar System orbiting the Sun.
Sometimes their relative sizes are shown, but it is impossible to depict the space between them – the orbital distances of each of them from our central star.
Our Solar System is huge and the distances between the planets are difficult to comprehend. A look at the various units required for measuring distance in space reveals just what astronomers are up against!
Using scale models helps us to visualise this.
In this project we'll show you how to make a model of the Solar System that shows the distances between the planets to scale. It makes for a fun science and astronomy project for kids, both at home and in school.
For more like this, read our guides on how to make an eclipse model, how to make a model of the Milky Way and how to make a Solar System mobile.
Making your Solar System model to scale
As the distances between the Solar System planets are so big, it’s almost impossible to have both accurate planet sizes and distances in one scale model.
If we scaled the distances based on the Sun’s size we used in this model, Neptune would be half a kilometre away!
This is not something you can squeeze into most gardens.
For this project, we are creating a model that shows the distances at a scale that can fit into a garden or park.
The radius of our Solar System model has been scaled down to 10m.
If our Sun and planets were at the same scale, the Sun would have a diameter of 3cm, but Mercury would be a microscopic 0.1mm, Earth 0.2mm and the largest planet Jupiter just 3mm.
Obviously we can’t replicate that for our Solar System model.
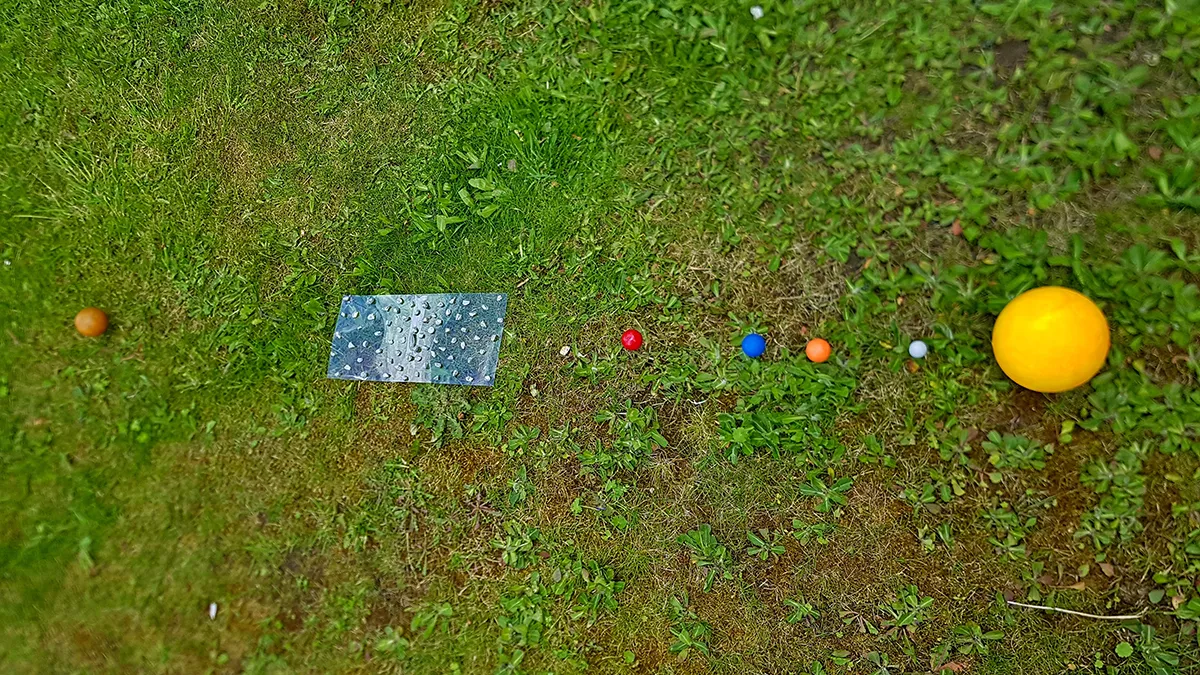
Instead, we’ll be using polystyrene balls of different sizes to show that the planets vary in diameter, but they aren’t at any specific scale relative to each other or to the distances.
We opted for:
- Sun at 11cm
- Mercury at 2cm
- Venus, Earth and Mars at 3cm
- Jupiter at 6cm
- Saturn, Uranus and Neptune at 4.5cm
We’ll place our planets in a straight line, but they would really extend out by 10m in all directions from our star.
The distance between the Sun and the Earth is 150,000,000km; this is 1 Astronomical Unit (AU).
To make the maths simple when calculating the distances for our model, begin by working with a scale of 1 AU to 1 metre.

With Neptune at 30 AU, it means the model would be 30m, which is still larger than most gardens. Indeed, we only had 10m to work with.
But as this is three times smaller, we got the distances in metres for each planet down to a manageable scale by dividing the AU for each planet by three.
You can adapt this calculation to fit your Solar System model in your garden, park or green space.
To calculate the distances from the Sun for each of the planets are in our measurements table, download our scale model of the Solar System PDF.
We’ve also included the inner and outer edge of the asteroid belt.
We painted our Sun and planets an appropriate solid colour so they would show up better in photos, but you can add surface features and the rings of the four giant planets.
The end result will give you and your young helpers an invaluable insight into the distances in our planetary neighbourhood.
Tools and materials
- 9 polystyrene balls of different diameters for the Sun and planets
- Cocktail sticks or small wooden skewers to stick the planets into the ground
- Water-based paint for each planet
- Small stone chips and a piece of clear plastic or card to create the asteroid belt. We used a piece measuring 33cm x 15cm and made it by sticking two pieces together with clear tape.
- A long tape measure. If you are measuring by yourself, peg the end of the tape to the ground with a barbecue skewer.